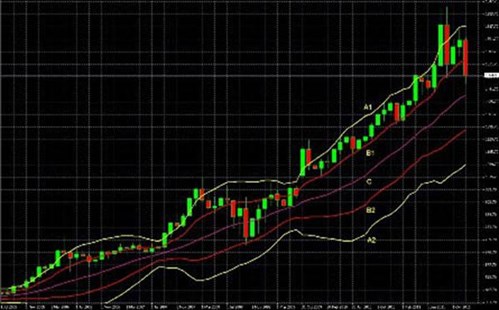
As we have already shown, two sets of Double Bollinger Bands create three zones: a sell zone, a buy zone, and a neutral zone. In this lesson, we will show how prices move within these zones and what these moves can mean for the trader.
When using the Double Bollinger Bands indicator, it is essential that you follow the 3 rules outlined in this lesson.
I've mastered this topic, take me to the next lesson
We strongly recommend you open a free trading account for practice purposes.
The Double Bollinger Band Trading System is a strategy for trading. When a trader is in a highly volatile market environment, Double Bollinger Bands help the trader to identify whether or not he is in a trend. If he is, it’s a good idea for him to look for opportunities to join that trend or he can go ultra-short term where he would be staying in a position for no more than a couple of hours.
Double Bollinger Band indicators give the trader a heads up on the right time to buy or sell Forex. When viewing a graph with Double Bollinger Bands, a trader must keep in mind that the two Bollinger bands on the top are often referred to as the uptrend zone; the two Bollinger bands on the bottom as the downtrend zone.
So if the currency pair has a very strong uptrend, usually it will remain in the one-two band zone on the upside. If it’s in a downtrend and the downtrend is strong, it will be in the one-two band zone on the downside.
When it comes out of that zone, however, and when it goes from the downtrend into the range-trading zone—the middle space—that is an indication that the trend is breaking.
There are four rules for using Double Bollinger Bands:
Rule 1: Go short when price is in or below the DBB sell zone.
Rule 2: Go long when price is in or above the DBB buy zone.
Rule 3: Don’t trade based on DBBs when price is between the buy and sell zones.
Rule 4: Minimize risk by waiting until price retraces to the cheaper end of the buy or sell zone or takes partial positions.
As noted in the last lesson, two sets of Bollinger bands create three zones. Using a Double Bollinger Bands indicator to predict price movements can be tricky.
Let’s look at the chart below:

The DBB Buy zone: When a price is within this upper zone (between the two topmost lines, A1 and B1), that implies strong upward momentum and that the uptrend is more likely to continue.
Rule: When candles continue to close in this uppermost zone, that’s a signal to enter or maintain long positions, as well as to avoid short positions and to close any remaining shorts still open.
The DBB Sell zone: When the candles remain in the bottom zone (between the two lowest lines, (A2 and B2), that suggest strong downward momentum and that the downtrend will probably continue.
Rule: When candles continue to close in this sell zone, that’s a signal to enter or maintain short positions, as well as to avoid long positions and to close any remaining open long positions.
The DBB Neutral zone: When price is within the area bounded by the one standard deviation bands (B1 and B2), that means there is no strong momentum or trend.
Rule: Typically one to three consecutive candles closing in this area are your signal to exit any trades that are riding the current up or down trend, because that trend is showing weakness.
In other words, when a price makes a sustained move into the neutral zone, that’s a signal to:
Notice how we phrase these rules. We didn’t say something like: “when price is in zone X, do Y.” Rather we stuck to wording like: “when price is in zone X, that’s a signal to do Y.”
Here is a reminder: Never trade based on just one indicator, even if it is a Double Bollinger Bands indicator!
We generally would not enter a long position just because the price is hitting support, nor would we usually open a short position just because price is hitting resistance.
Similarly, we wouldn’t enter or exit positions solely based on DBBs signals.
You should generally not make entry or exit decisions based on just one technical indicator such as the Double Bollinger Bands indicator. The above signals must always be considered together with:
Other technical indicators: Look for confirmation from different kinds of indicators that it’s a good time to enter or exit a position. Similarly, if there are conflicting signals from other indicators besides the Double Bollinger Bands indicator, we might wait until the picture becomes clearer.
For example, if price enters the buy zone, but we know that a strong resistance area is just above the current price, we might wait until the pair makes a decisive break above that resistance before entering a new long position. How long we wait is often a decision based on how we prioritize risk versus reward. The sooner we enter, the larger our potential profits if we’re correct, and the higher our risk of entering too soon and suffering a loss from a “false breakout.
If the EURUSD moves into the buy zone but we suspect that the ECB might announce an interest rate cut at its monthly meeting and rate statement later in the week (which would likely drive the pair lower) we might ignore the technical entry signals and wait until that event passes.
We’ll discuss later the number and types of technical indicators we want to use in combination.

We hope you found our site useful and we look forward to helping you again soon!


